Lash Lift Silicone Shields
Choosing the right shape and size of silicone shields for every customer is a super important part of the lash lift treatment. It's one of those things that separates lash artists from lash techs who use the same one or two different silicone shields on everyone. It's similar to using the same curl of lash extensions on everyone instead of tailoring each set.
If you desire to offer great results, you should always have different silicones available and understand how to choose them correctly.
There are a lot of different silicone shields on the market, so it can be confusing as to which ones you should try and stock in your salon.

What's the difference between silicone shields?
Before jumping to the details, there is one thing I want to highlight: silicones that look similar on different websites are actually made with very different quality silicone and mold. So, I always recommend testing other brands until you find silicones you love and are happy with.
The new generation of lifting shields is glue-free. Due to the super soft silicone, they have been made of, they can be applied to the eyelid without glue! They hug the eyeball snugly and won't move out of place during the treatment.
This makes their application and clean-up process at the end of the service much faster, cutting down on your treatment time. They also feel much more comfortable for the customer and are especially recommended for customers with sensitive eyes.
Different silicone types are marked differently for sizes, but the most popular marking system comprises letters and numbers. Here is an example of our most popular silicones from the smallest size that creates the strongest lift to the largest, which gives the most natural lift:
S, S1, M, M1, L, L1, XL, XL1

Over time all lash artists develop their preferences for silicone shield sizes. Still, I recommend choosing the shield size depending on the length of the customer's natural lashes.
Your customer's lashes should reach the top edge of the silicone's protruding part like this:

You can use smaller sizes to create a more dramatic lift. However, the apex should be at least 30% of the natural lash to avoid an unnatural bend which can also cause discomfort for the client. Eyelashes can go over the shield's edge, but in this case, one must remember not to use lifting/curling lotions on the tips of the eyelashes to avoid kinks.
Different silicone shapes
Silicone shields come in 3 main different shapes that are visible when the silicone is cut in half. On the left is the shape of the silicone with recommended lifting lotion application in regards to its apex, and on the right is the shape of the curl they produce:

Flat silicone shields - create a lift rather than a curl (if you are familiar with lash extension curls, then this lift compares to the M-curl in extensions). These are perfect for straight and upward-growing lashes and deep-set eyes.
Teardrop silicone shields - create a similar shape of lift but stronger. They give lashes the appearance of being longer compared to other shield shapes.
Round silicone shields - to lift lashes in a round shape. Always use this shape for downward-growing lashes because the lift effect will last a lot longer:
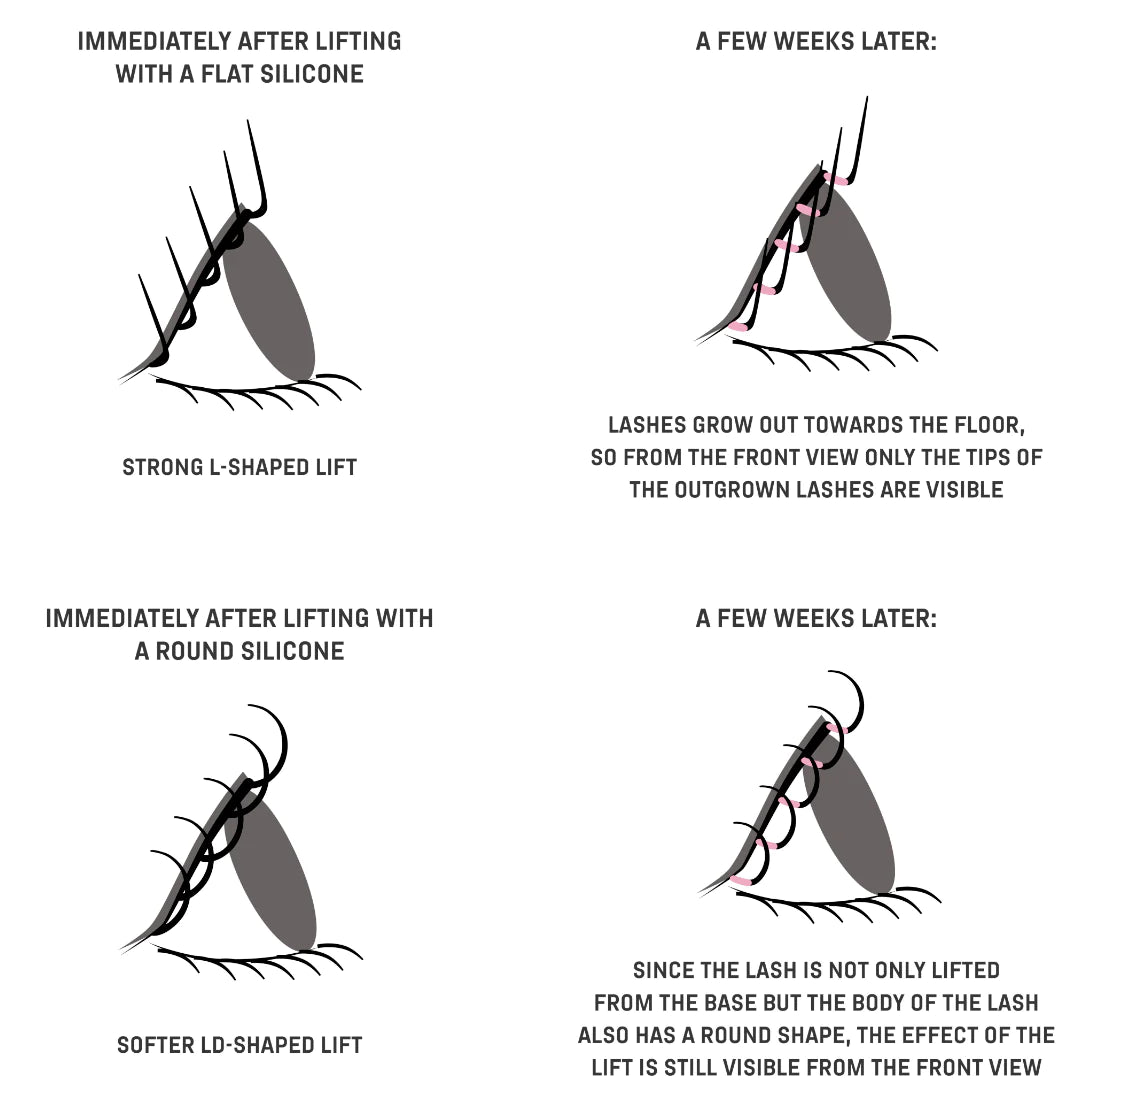
It's best always to have flat and round silicone shields in different sizes available so you can choose the best option for all customers. Our 8-pair silicone set includes four flat lifting silicones: S1, M1, L1, and XL1 + 4 round silicones: S, M, L, and XL.
Another differentiator in silicone shields is whether they are tapered on both ends like these silicone shields:

Or they have more tapering on one side than the other, so you have different silicone shields for the right and left eye. Like these:

The benefit of tapering one side more than the other is that it lifts the inner corner lashes slightly more than the outer corner. This results in a more even overall result.
PRO TIP: You can reverse the silicone shields (use the left eye shield on the right and vice versa so that the tapered side is in the outer corner) to perfect the lift for lashes that grow more downwards in the outer corner.
PRO TIP: There is a silly trend around using micropore tape on eyelids underneath the silicone shields. This is supposed to make removing the silicone shields after the treatment easier Why do I say that it's silly? Because there is no need for it, especially with the new school silicone shields that don't require any glue on the eyelids! Micropore tape is super sticky and dries out the eyelids' skin for no reason.
How to choose the correct lash lift silicone shields?
During the consultation, look at your customer from their profile and tell them to look straight ahead. Then determine their lash growth direction and choose between teardrop, flat, and round silicone shields.
Also, ask the customer whether they prefer a more natural round shape or a stronger lift. It's best to have some pictures of the lifts you have previously done, as non-professionals often need help understanding the difference between lift shapes.
Once you have decided on the shape of the silicone you will use, it's time to start the treatment. Decide on the silicone shields' size when your customer is already lying down, and you can measure their lashes on the silicone shield.
Your customer's lashes should reach the top edge of the silicone's protruding part like this:

We don't recommend using anatomical silicone shields on lashes shorter than 6mm because the apex won't allow for creating a visible lift. For super short lashes, we recommend using the S1 size from this set:

This work is licensed under a Creative Commons Attribution-NonCommercial 4.0 International License.