Eye Pads & Tapes
The customer’s lower lashes are covered with eye pads or tapes (or both, tape covering the eye pad) for all eyelash extensions and lash lift treatments to isolate them from the upper lashes and prevent them from glued together. The eye pads & tapes are available in different sizes, shapes, and colors: choose the most convenient ones, considering your and the customer’s preferences.
What to bear in mind when choosing them?

Most popular eye pads
Lint-free eye pads – suitable for most eye shapes and do not have a lot of gel.
Mini eye pads – super light and most petite of all eye pads = which makes lashing easier. Perfect for small eyes and deep-set eyes. Not suitable for very coarse lashes as the bottom lashes can push the tiny eye pad up. Almost no gel.
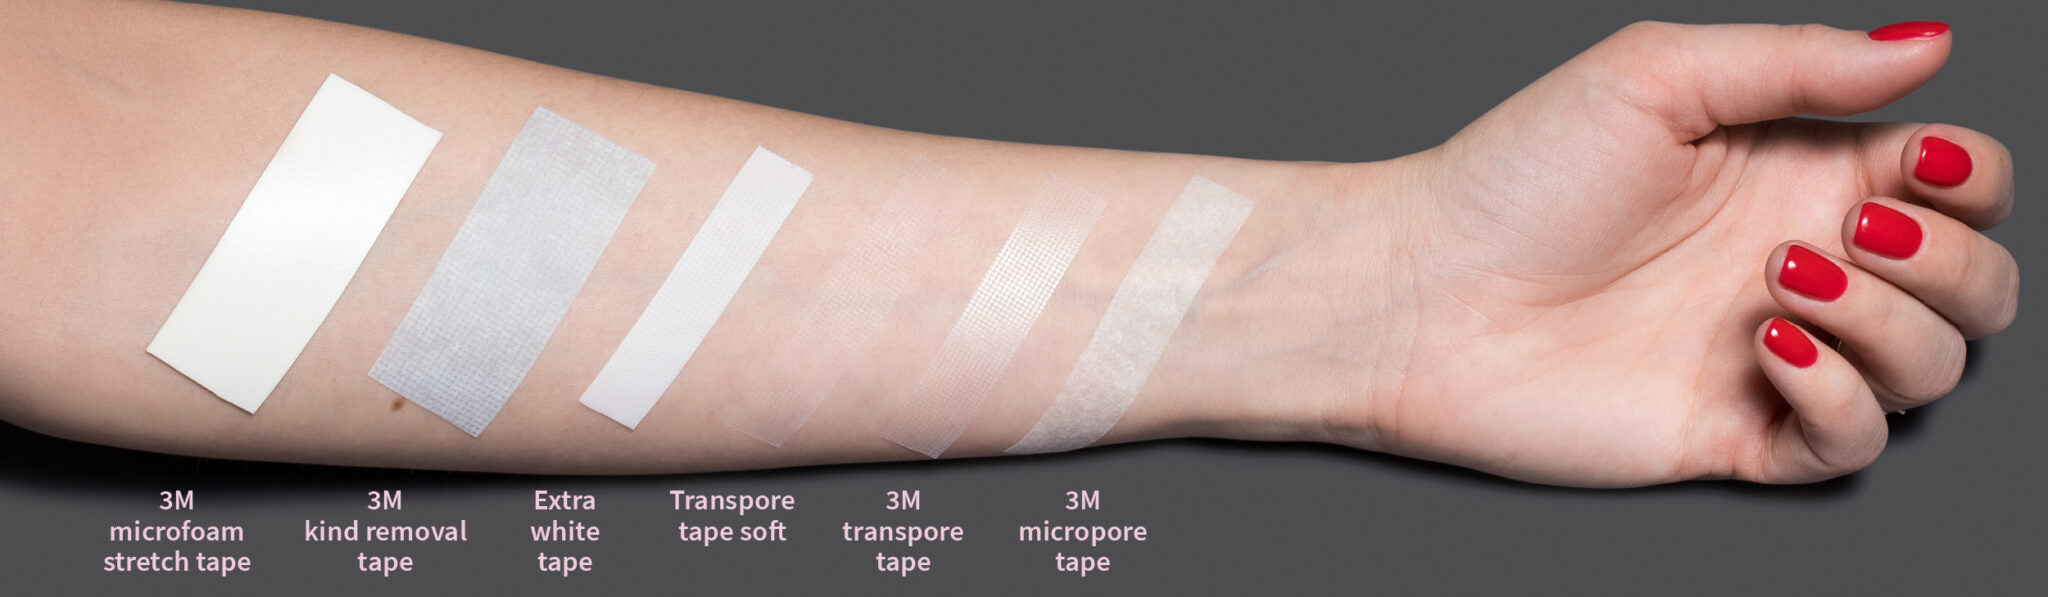
Most popular tapes (none of them contain any gel)
3M microfoam stretch tape – the only hypoallergenic tape initially created for wound care = no gel = no irritation whatsoever. Upside: it’s super stretchy, so it can be stretched to fit almost all eye shapes. Downside: quite thick, so more challenging to work with + quite sticky, so should be de-tacked a bit before using.
3M kind removal tape – Pros: perforated so it can be torn instead of cut, light blue in color, so perfect for blonde lashes, not too sticky. Cons: the most expensive of all tapes.
Extra White Tape – the whitest of all tapes available! 100% opaque, so it creates different contrast for lashes. Not too sticky and can be stretched to fit any eye shape. Super affordable. Cons: none – this is Ruthie Belle’s personal favorite!
Transpore tape soft – NB! is not to be confused with regular transpore tape, which is very sticky! However, it’s the least sticky of all tapes available, so completely pain-free during removal, even without de-tacking first. It’s perforated, so it can be torn instead of cut, and it is super affordable. Perfect to use on top of gel pads. Cons: If you want to create an X-shape under the eyes, this might not be the best option as it’s not very sticky, so the layered part of the X can start lifting; also, it’s not 100% opaque.
3M transpore tape – the only pro: perforated so it can be torn instead of cut. Cons: super sticky, so it definitely needs to be de-tacked before using; not 100% opaque. It’s a pretty old-school product and was popular when lash artists didn’t have much choice to choose from. I’d recommend not using this.
3M micropore tape is the oldest of all for lash artists. Very sticky with a sharp edge. It can only be used on top of a gel pad and not directly on the skin because removal can be very uncomfortable for the client.
How to apply eye pads & stretchy tape that has been cut in shape
The customer should look straight up (not back at the technician, as this would make the lower lid move too much). Next, press the pad gently, only applying pressure onto its center (distance from the wet line should be at least 1 mm). Then ask the customer to close her eyes and shift the gel pad downwards as needed so it doesn’t touch the eyeball.
How to apply eye pads with tape
This is the most secure way to isolate bottom lashes. Apply eye pads first, as explained previously, only 2-3 mm from the wet line, then cover it with tape as described.
After placing eye pads or tape, always check with your customer that they do not feel any irritation/itchiness, and gently lift the eyelid to check that the pad/tape is NOT on the wet line but just underneath it.

Readjust if necessary! If eye pads/tape are placed too close to the eye, they can cause severe damage to the eye's cornea, not to mention discomfort to the client during the service.
This work is licensed under a Creative Commons Attribution-NonCommercial 4.0 International License.